
Definition
Organization webhooks are payloads that are sent to a configured endpoint whenever an action occurs at the organization level. This includes user management webhooks, such as: user.invitation_sent, user.invitation_acceptance, user.role_set, user.removal_from_org, and usage webhooks: usage.threshold_reached.
Queries
Queries are used to fetch data using the parameters you've given as arguments. If you want to know more about queries and other GraphQL terms, read here
Below is how you query for a certain organization's webhooks. This takes in the organization's ID as it's only argument:
{
  organization(id: 12345) {
    webhooks {
      id
      name
      email
      actions
      url
      headers
    }
  }
}
{
  organizations(ids: [12345, 67890, 98765]) {
    webhooks {
      id
      name
      email
      actions
      url
      headers
    }
  }
}
Mutations
If you want to create, make a change to, or eliminate a webhook, you can do that using a mutation.
Create
The first tab in the code block shows how to create an organization webhook. The required arguments are:
actions: [String]!(seeUser Management Webhookssection to see which valid actions are available)name: String!url: String!organization_id: ID!
Update
The second tab in the code block shows how to update an organization webhook. In the example, we're updating the action, headers, and email parameters of a webhook. The webhook's ID is the only necessary argument.
Delete
The third tab in the code block shows how to delete an organization webhook. The webhook's ID is the only necessary argument.
mutation {
  createOrganizationWebhook(input: {
    actions: ["user.invitation_sent"],
    name: "Webhook 1",
    organization_id: 123456,
    url: "https://your-endpoint.com/"
  }) {
    webhook {
      id
      actions
      url
    }
  }
}
mutation{
  updateOrganizationWebhook(input:{
    id:123
    actions:["user.role_set"] # New action
    headers:["Header"] # New header
    email:"[email protected]" # Adding Email
  })
}
mutation {
  deleteOrganizationWebhook(input: {id: 123})
}
User Management Webhooks
User Invited
Suppose you want to receive a webhook payload with the event's information whenever a user is invited to your organization. In this case, you can use user.invitation_sent as an argument in the actions parameter. See below how to create this webhook:
mutation {
  createOrganizationWebhook(input: {
    actions: ["user.invitation_sent"],
    name: "User Invited",
    organization_id: 123456,
    url: "https://your-endpoint.com/"}) {
    webhook {
      id
      actions
      url
    }
  }
}
Response for invitation_sent
invitation_sentBelow is an example of this webhook's payload format.
{
  "data": {
    "payload_id": "0x0x0x0x-0xx0-00xx-0000-x0x000x0x000",
    "action": "user.invitation_sent",
    "user": {
      "id": 12345,
      "name": "John Doe",
      "username": "john-doe",
      "email": "[email protected]",
      "avatar_url": "https://gravatar.com/avatar/0000x0x0x000000x0x00000xx0000xx0.png?s=144\u0026d=https://pipestyle.staticpipefy.com/v2-temp/illustrations/avatar.png"
    },
    "user_invited_by": {
      "id": 98765,
      "name": "Jane Doe",
      "username": "jane-doe",
      "email": "[email protected]"
    },
    "to": { "organization_id": 11111, "name": "Organization 1" }
  }
}
Invitation Accepted
Suppose you want to receive a webhook payload with the event's information whenever someone you've invited to join your company accepts the invitation. You can use user.invitation_acceptance as an argument in the actions parameter of the webhook creation mutation.
Important
The webhook only triggers if a user with that email address has not yet been created within Pipefy, and only if they create an account via the invitation link. If a person creates an account manually, and is then invited to an organization, this webhook will not be triggered.
Below is an example of how to create this webhook:
mutation {
  createOrganizationWebhook(input: {
    actions: ["user.invitation_acceptance"],
    name: "User Invitation Acceptance",
    organization_id: 123456,
    url: "https://your-endpoint.com/"}) {
    webhook {
      id
      actions
      url
    }
  }
}
Response for invitation_acceptance
invitation_acceptanceBelow is an example of this webhook's payload format.
{
  "data": {
    "payload_id": "0x0x0x0x-0xx0-00xx-0000-x0x000x0x000",
    "action": "user.invitation_acceptance",
    "user": {
      "id": 12345,
      "name": "John Doe",
      "username": "john-doe",
      "email": "[email protected]",
      "avatar_url": "https://gravatar.com/avatar/0000x0x0x000000x0x00000xx0000xx0.png?s=144\u0026d=https://pipestyle.staticpipefy.com/v2-temp/illustrations/avatar.png"
    },
    "accepted_at": "2022-03-22 23:21:57 UTC"
  }
}
Permission Role Change
Suppose you want to receive a webhook payload with the event's information whenever a user has their permission changed at an organization level. You can use user.role_set as an argument in the actions parameter of the webhook creation mutation. Below is an example of how to create this webhook:
mutation {
  createOrganizationWebhook(input: {
    actions: ["user.role_set"],
    name: "User Permission Change (Organization)",
    organization_id: 123456,
    url: "https://your-endpoint.com/"}) {
    webhook {
      id
      actions
      url
    }
  }
}
Response for role_set
role_setBelow is an example of this webhook's payload format.
{
  "data": {
    "payload_id": "0x0x0x0x-0xx0-00xx-0000-x0x000x0x000",
    "action": "user.role_set",
    "user": {
      "id": 12345,
      "name": "John Doe",
      "username": "john-doe",
      "email": "[email protected]",
      "avatar_url": "https://gravatar.com/avatar/0000x0x0x000000x0x00000xx0000xx0.png?s=144\u0026d=https://pipestyle.staticpipefy.com/v2-temp/illustrations/avatar.png"
    },
    "action_done_by": {
      "id": 98765,
      "name": "Jane Doe",
      "username": "jane-doe",
      "email": "[email protected]"
    },
    "from": { "organization_id": 11111, "name": "Organization 1" },
    "previous_role": null,
    "new_role": "admin",
    "action_done_at": "2022-03-22 20:06:14 -0300"
  }
}
Removal From Organization
Suppose you want to receive a webhook payload with the event's information whenever a user is removed from your organization. You can use user.removal_from_org as an argument in the actions parameter of the webhook creation mutation. Below is an example of how to create this webhook:
mutation {
  createOrganizationWebhook(input: {
    actions: ["user.removal_from_org"],
    name: "User Removal From Organization",
    organization_id: 123456,
    url: "https://your-endpoint.com/"}) {
    webhook {
      id
      actions
      url
    }
  }
}
Response for removal_from_org
removal_from_orgBelow is an example of this webhook's payload format.
{
  "data": {
    "payload_id": "0x0x0x0x-0xx0-00xx-0000-x0x000x0x000",
    "action": "user.removal_from_org",
    "user": {
      "id": 12345,
      "name": "John Doe",
      "username": "john-doe",
      "email": "[email protected]",
      "avatar_url": "https://gravatar.com/avatar/0000x0x0x000000x0x00000xx0000xx0.png?s=144\u0026d=https://pipestyle.staticpipefy.com/v2-temp/illustrations/avatar.png"
    },
    "user_removed_by": {
      "id": 98765,
      "name": "Jane Doe",
      "username": "jane-doe",
      "email": "[email protected]"
    },
    "from": { "organization_id": 11111, "name": "Organization 1" },
    "action_done_at": "2022-03-22 20:45:36 -0300"
  }
}
Usage Webhooks
Usage Threshold Reached
Suppose you want to be notified whenever your organization's monthly consumption of a paid resource reaches a share of its contracted limit, so you can throttle an integration or open a ticket without anyone reading an email. You can use usage.threshold_reached as an argument in the actions parameter of the webhook creation mutation. Below is an example of how to create this webhook:
mutation {
  createOrganizationWebhook(input: {
    actions: ["usage.threshold_reached"],
    name: "Usage Threshold Reached (Organization)",
    organization_id: 123456,
    url: "https://your-endpoint.com/"}) {
    webhook {
      id
      actions
      url
    }
  }
}
A subscription is all or nothing. An organization already subscribed to usage.threshold_reached receives every resource this action covers, including integration. You cannot subscribe to one threshold or one resource alone.
automation and api fire at 80%, 90%, 100% and 150% of the monthly limit. Each of those thresholds is delivered once per resource per month. When consumption jumps past more than one threshold between checks, only the highest one crossed is delivered: usage moving from 75% to 105% sends one payload for 100, and none for 80 or 90.
integration fires at 75% and 100%. Reaching 100% is when custom integrations pause. A jump that skips 75% delivers only 100. Each integration threshold is delivered once per organization per month.
Detection follows your own activity rather than a clock. An organization that crosses a threshold and then stops running automations or calling the API is notified on its next action in that resource.
Response for threshold_reached
threshold_reachedBelow is an example of this webhook's payload format.
{
  "data": {
    "action": "usage.threshold_reached",
    "payload_id": "0x0x0x0x-0xx0-00xx-0000-x0x000x0x000",
    "organization": { "id": 123456, "uuid": "0x0x0x0x-0xx0-00xx-0000-x0x000x0x000" },
    "resource": "automation",
    "threshold": 80,
    "usage": { "consumed": 1850, "limit": 2000, "percentage": 92.5 },
    "period": { "resets_at": "2026-10-01" },
    "action_done_at": "2026-09-09T14:32:10Z"
  }
}
The same action carries custom-integrations crossings. usage.percentage is the floored integer the detector already computed, so it can be higher than the threshold that fired (80 is higher than 75).
{
  "data": {
    "action": "usage.threshold_reached",
    "payload_id": "0x0x0x0x-0xx0-00xx-0000-x0x000x0x000",
    "organization": { "id": 123456, "uuid": "0x0x0x0x-0xx0-00xx-0000-x0x000x0x000" },
    "resource": "integration",
    "threshold": 75,
    "usage": { "consumed": 375, "limit": 500, "percentage": 75 },
    "period": { "resets_at": "2026-10-01" },
    "action_done_at": "2026-09-28T14:32:10Z"
  }
}
| Field | Description |
|---|---|
resource | The resource whose limit was reached: automation, api, or integration. |
threshold | The share of the monthly limit that was reached. automation and api use 80, 90, 100 or 150. integration uses 75 or 100. |
usage.consumed | Consumption measured for the current month. |
usage.limit | The contracted monthly limit. |
usage.percentage | Consumption as a percentage of the limit, which may exceed the threshold that was crossed. For automation and api this is a number with up to two decimal places. For integration it is a floored integer. |
period.resets_at | The date the monthly counter resets, in UTC. |
action_done_at | When the threshold was detected, in UTC. |
Identifying an event
A failed delivery is retried, and
payload_idis regenerated on each attempt, so it does not identify the event. Deduplicate onorganization.id,resource,thresholdandperiod.resets_attogether, which stay the same across every retry of the same crossing.
Testing Our API
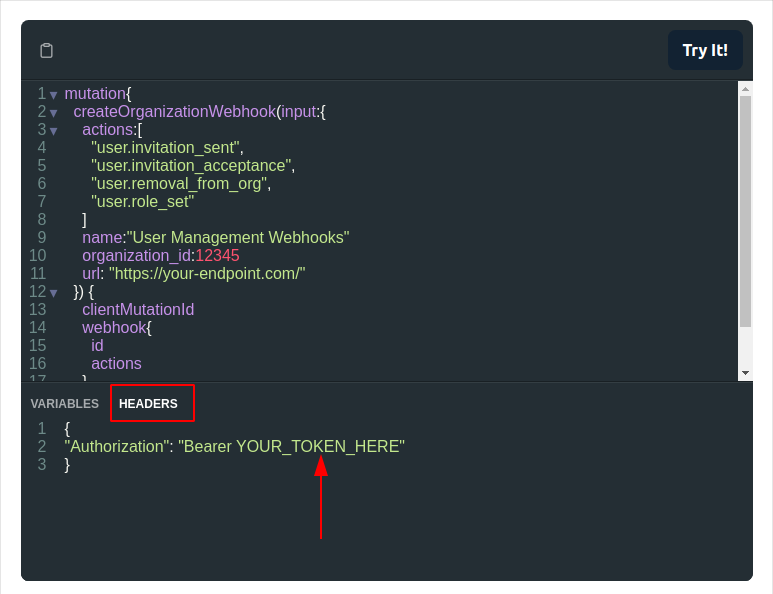
For a full list of our GraphQL capabilities, you can access our GraphQL playground and play around with it.
API Authentication
Our API is protected, so you have to provide your access token to be able to complete the requests to our API.
You can read more about our Authentication and how to get your access token in our Authentication section.Once you have the token in hands, within our playground you'll have to add a key in the headers named "Authorization", and the value must be the name "Bearer" followed by your token, like in the image below.